
Admin Control Panel Guide
No matching results on this page
Try a different word, or clear the search box.
Step-by-step screens for backend users. Menu paths and setting names are written exactly as they appear in the panel.
Your dashboard right after logging in
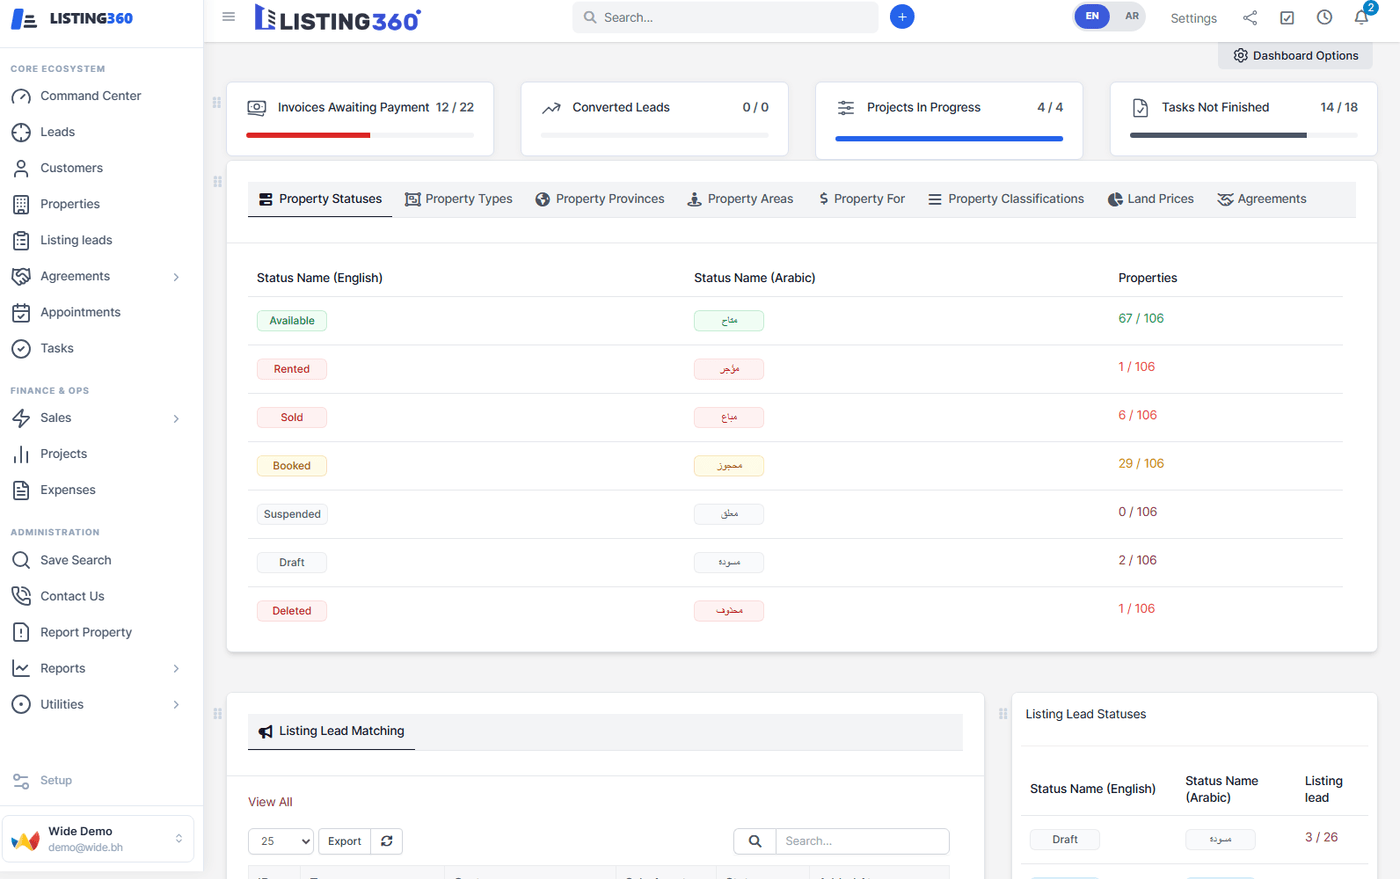
The sidebar on the left is your main menu — what you see there depends on your permissions.
Menu: Properties
The Properties list
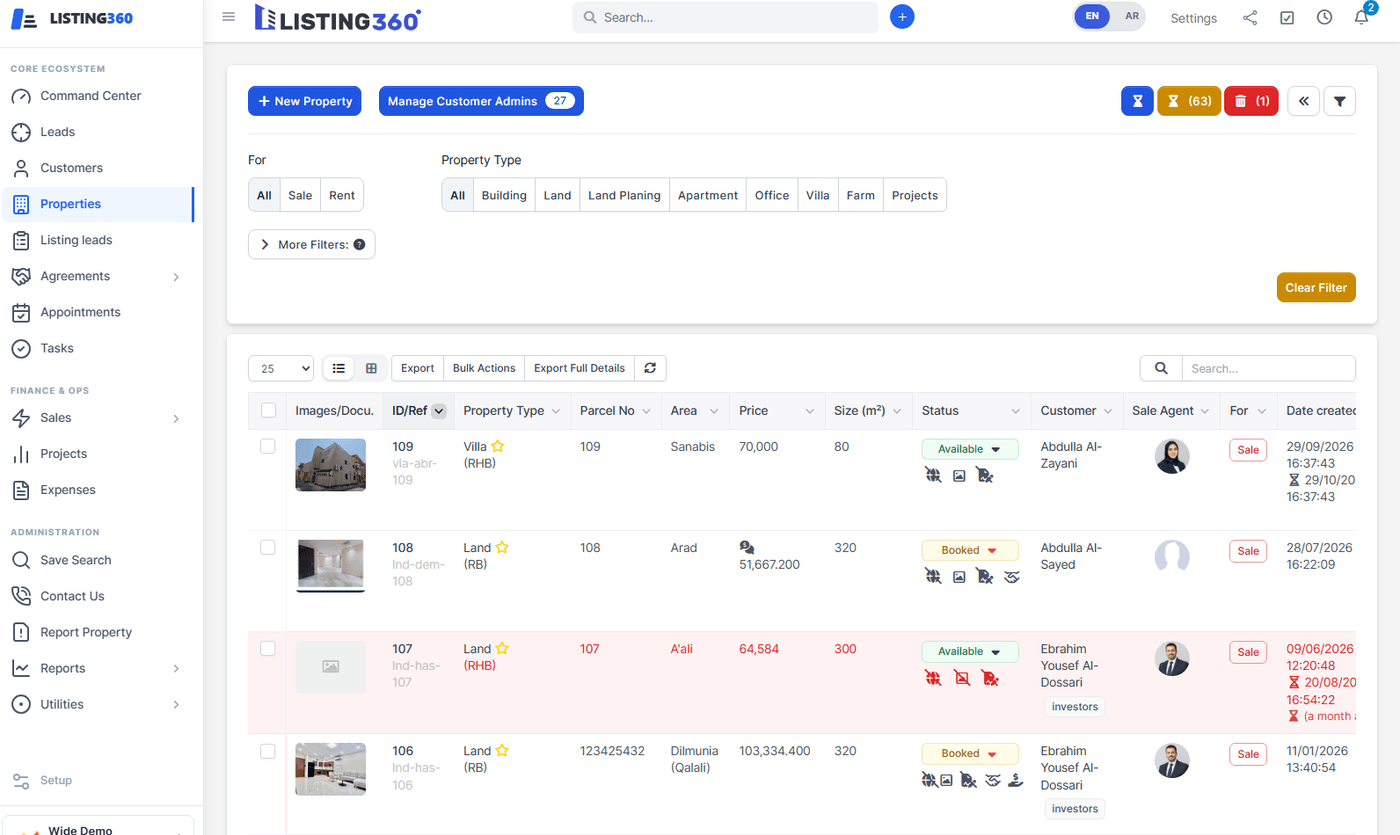
Filter by type, status, or area, and click any row to open it.
The property form
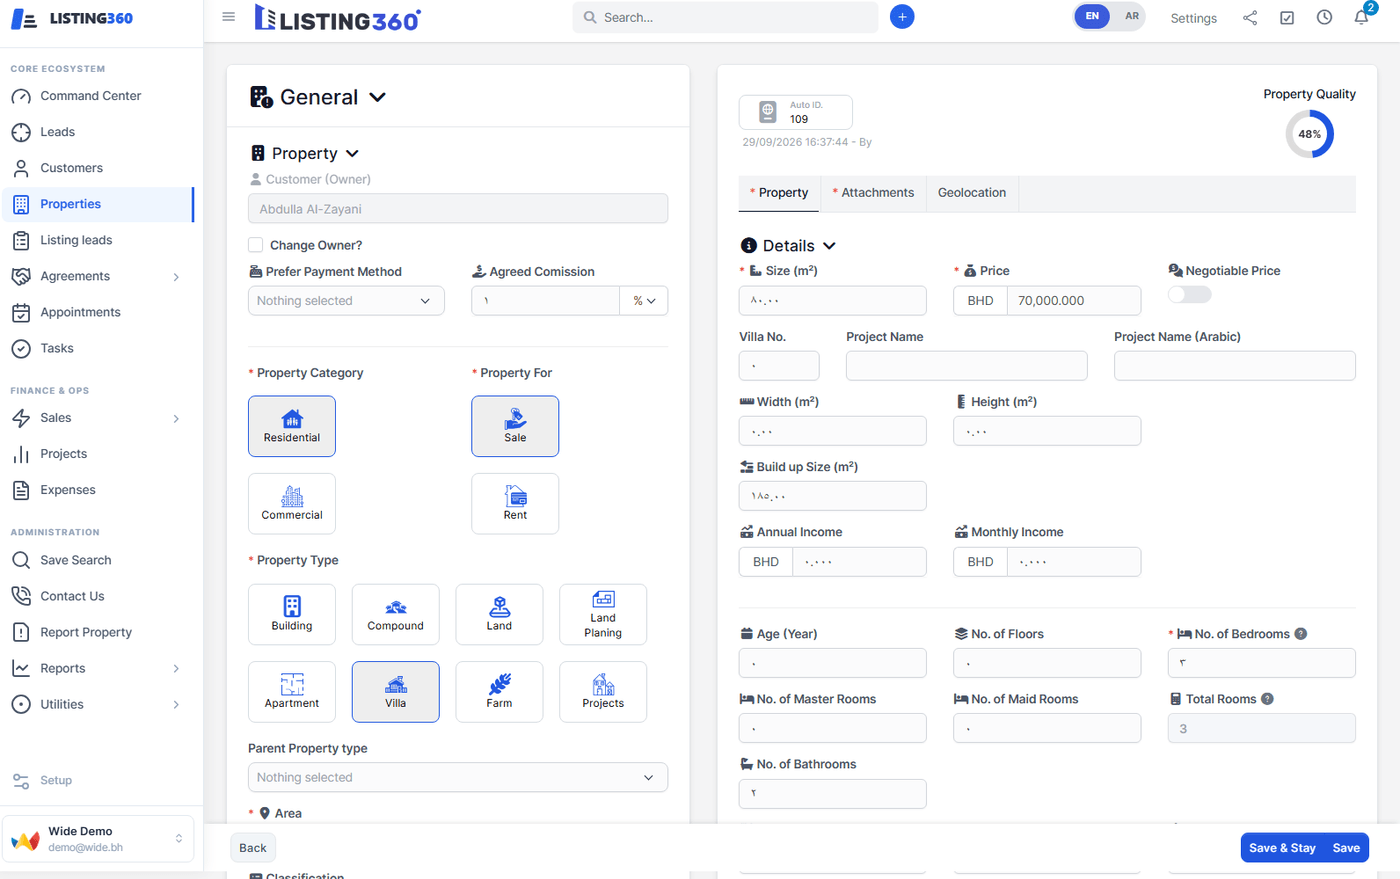
Category, type, area, price, and facilities are all set here.
This is the platform's core sales engine
This section reflects the most recently updated lead-management logic. If it conflicts with older training material, trust this section.
Menu: Listing leads → Listing leads / Requests · Setup → Listing lead Source · Setup → Properties → Settings → "Listing lead" tab
The system enforces which transitions are allowed — you can't jump straight from "Draft" to "Won."
Draft
Lead created, not yet worked.
Assigned
A sales agent is assigned.
Qualifying
Agent determines fit/budget/intent.
Qualified
Confirmed as a real opportunity.
Matching
Finding suitable inventory — requires actual matching stock.
Appointment Scheduled
Set automatically when you book an appointment.
Appointment Completed
The scheduled viewing happened.
Negotiating
Terms are being discussed.
Won
Deal closed — set automatically when an agreement is created.
The Listing Leads list, showing live pipeline statuses
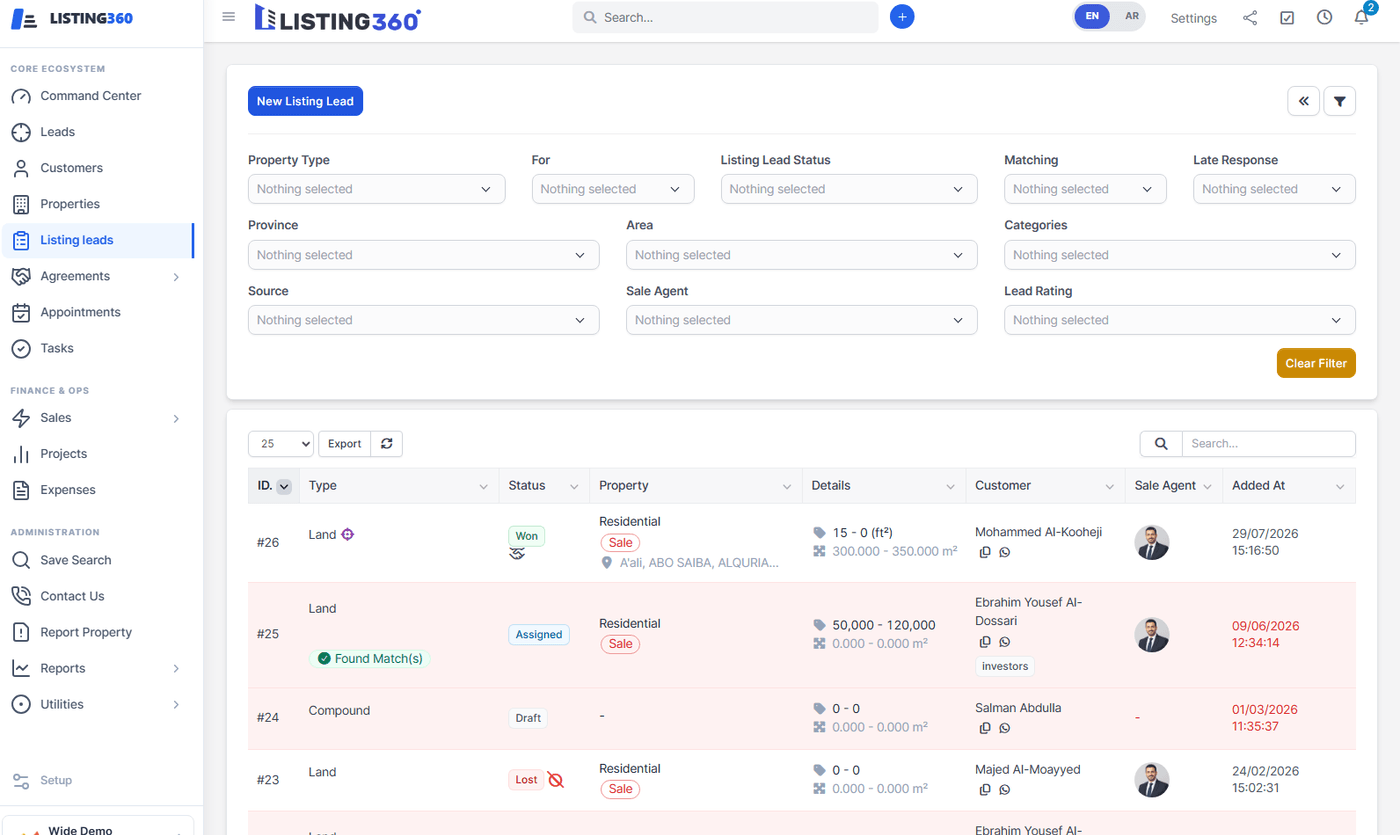
Each lead's current stage is shown as a colored status badge, with matched properties and dates alongside it.
Plus four exit states, reachable via the disposition form:
Lost
Dead, with a recorded reason.
Unqualified
Not a real opportunity.
Nurturing
Not ready now, parked for later.
Recycled
Returned to the pool for reassignment.
Every status change is recorded in a permanent activity log — this powers accurate reporting. Always use the proper status-change action rather than working around the pipeline.
One exception to "Won is always automatic"
Won is designed to be reached only by creating a Property Agreement (section 4) — but a staff member holding both the Sales Manager and Update Status Manually permissions (section 3.7) can set Won by hand as a deliberate safety net, for edge cases like correcting a data-entry mistake. This is an intentional override, not a bug — but use it sparingly, since every report and the Performance Index assume a Won lead has a real signed agreement behind it.
Setup → Listing lead Source
Eleven Sources are shipped ready to use: Website: listing360, API, Call Center, WhatsApp, Instagram, TikTok, Facebook, External Portal: Property Finder, Walk-in, Signboard, and Exhibition. Add your own at any time — every source you add is mirrored automatically into the CRM's own lead-source list, so if the listing lead is later handed to the standard CRM lead workflow, the channel carries across.
Ratings — Hot, Warm, or Cold — are a simple filter and sorting aid for how promising a lead looks. They're purely informational and don't affect any pipeline rule.
Setup → Listing lead Source
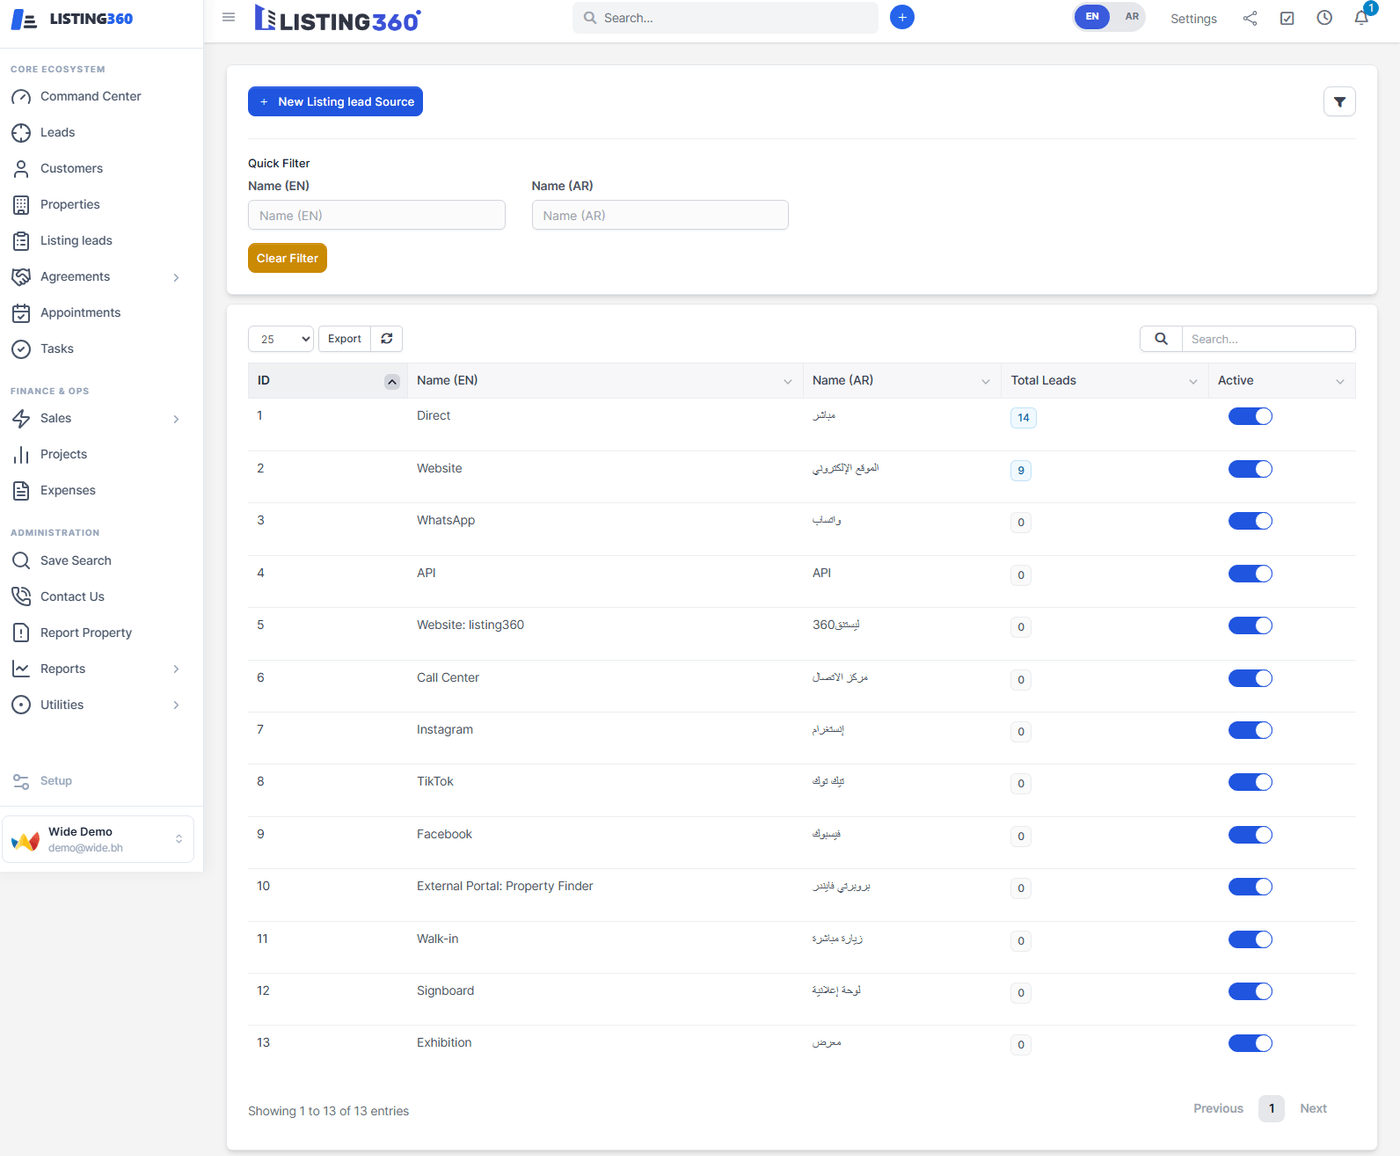
The sources shipped by default, each toggleable and showing its own lead count. Add your own at any time.
Inbound website enquiries land under the Requests tab first, where you review and convert them into full Listing Leads (or mark as duplicates).
Every lead is one of two shapes: General — "a 3-bedroom flat in Juffair under 150,000" — where matching searches the whole catalogue; or Specific — pinned to one exact target property, with an Autofill from property button that copies its category, type, location, price, size, and room counts into the request.
The contact picker warns on duplicates — it doesn't block them
Typing a phone number or name searches Clients, CRM Leads, and Website Leads at once, and offers Add as customer / Add as lead right there if nothing matches. If the contact you pick already has an active lead for the same target property (or the same type, category, province, and purpose with an overlapping area), you get a warning naming the existing lead numbers before you save — not a block, since a client can genuinely want two different things at once. Closed leads (Won, Lost, Unqualified, Nurturing, Recycled) are excluded from this check, so an old, finished lead never nags you.
The New Listing Lead form
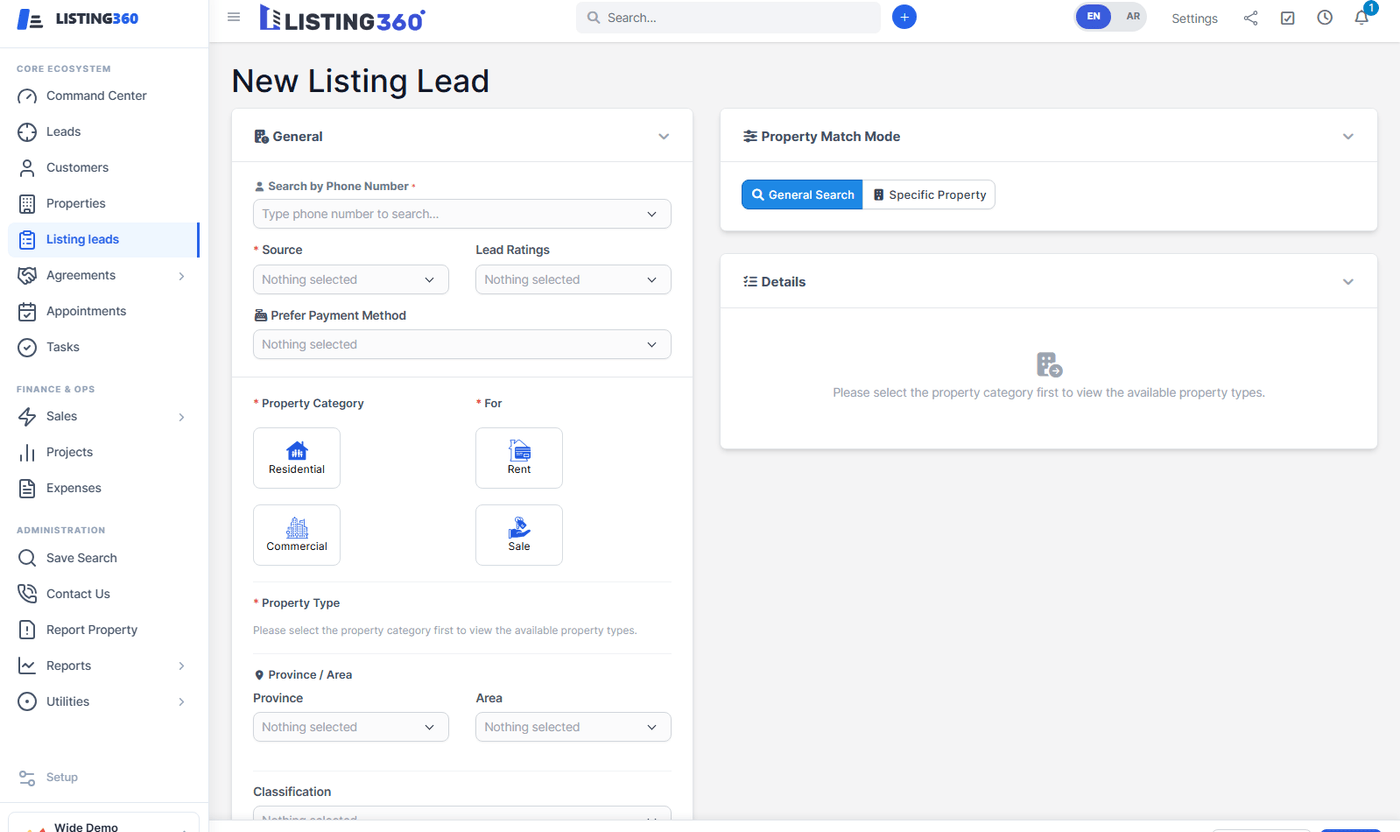
Property Match Mode is where you pick General Search vs. a Specific Property.
A lead's detail view
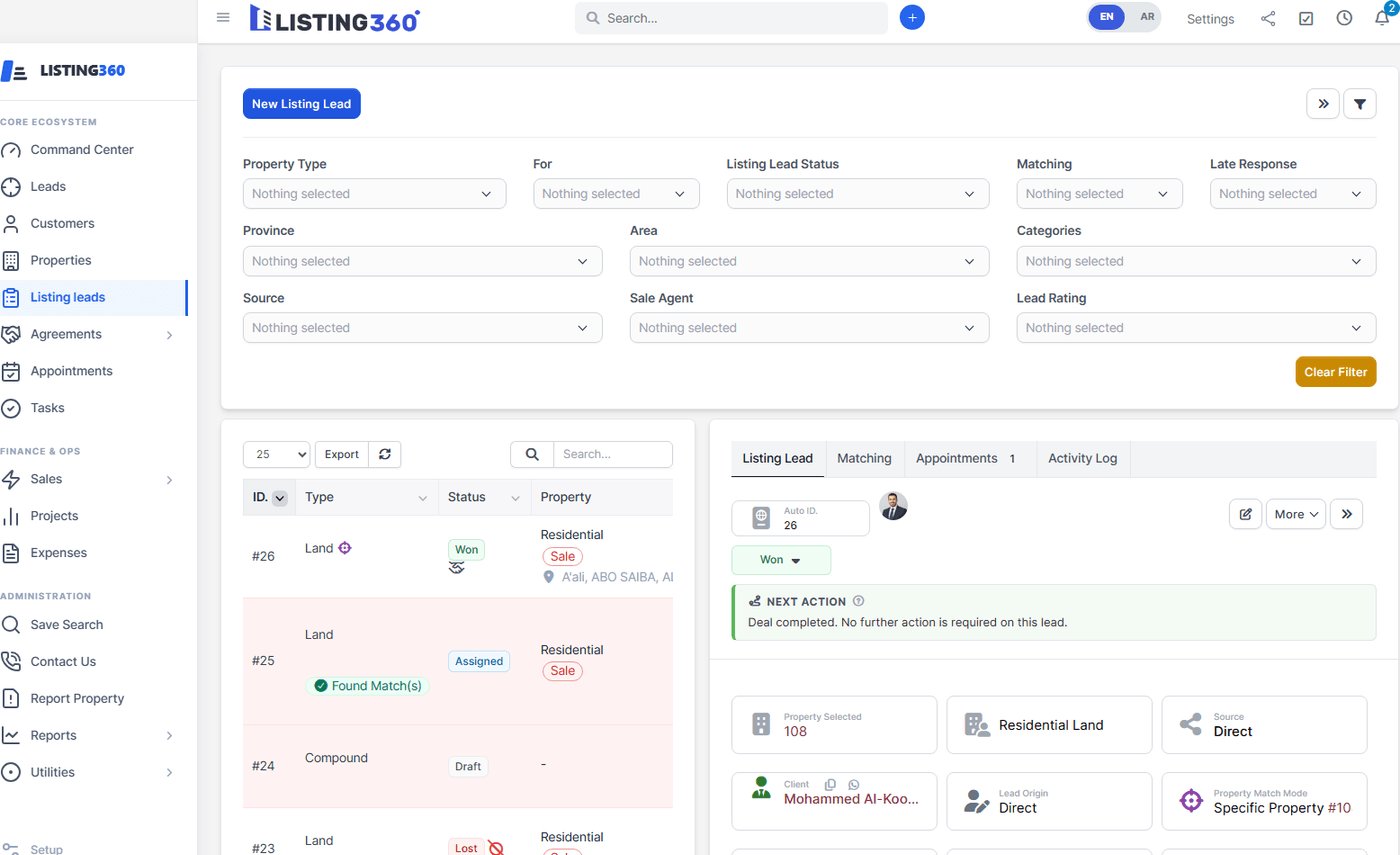
The Listing Lead / Matching / Appointments / Activity Log tabs on the right hold everything about this one lead.
Use the disposition form (from the lead's action menu) to record why a lead isn't moving forward — it sets status to Lost, Unqualified, or Nurturing, always with a required reason from a fixed list:
| Exit | Fixed reasons |
|---|---|
| Unqualified | Invalid or fake contact, below minimum budget, unserviceable location, spam/bot enquiry, competitor or agent scouting, unrealistic requirements. |
| Lost | Chose a competitor agency, no matching inventory, bank financing rejected, owner/landlord rejection, price or terms mismatch, bypassed agent (direct to owner), timing put on hold. |
| Nurturing | 30-day re-engagement hold, 90-day deferred-intent hold, 180-day delayed-financing/visa hold. |
| Any of the above | Client did not answer (multiple times), did not answer from other numbers, was not interested, found another property, or Other (with a free-text box). |
"Bypassed Agent" triggers a legal-recovery flow
Picking this Lost reason captures the client's CPR, writes a distinct entry to the lead's history, and notifies every sales manager so a recovery case can be opened. Use it deliberately.
An Offer is a shareable batch of matched properties an agent sends a client — no login required, they view and react on a public link. Use Create Offer on a lead, select properties, and share the link.
The client's reaction updates automatically through five states: Offered (sent, not opened yet), Viewed (opened on the share page), Selected (the client asked to see it), Rejected (turned down, reason optional), and Visited (a physical viewing took place).
Permissions live under Staff → Permissions → Listing Leads:
| Permission | Grants |
|---|---|
| View (own) | See only leads assigned to me. |
| View (global) | See every lead. |
| Create | Create leads. |
| Edit | Edit any lead. |
| Edit own | Edit only my own leads. |
| Delete | Delete leads. |
| Change customer | Reassign a lead to a different customer. |
| Change staff | Choose the agent (without it, the agent field is read-only). |
| Manage sources | Add and edit lead sources. |
| Update status manually | Override the pipeline rules; set Draft/Assigned/Lost directly, and — combined with Sales manager — manually set Won. |
| Sales manager | Receives manager notifications; required (with the above) to set Won by hand; can action the Recycle queue. |
A typical setup: agents get View (own), Create, Edit (own), and Change customer; team leaders add View (global) and Change staff; sales managers add Update status manually and Sales manager.
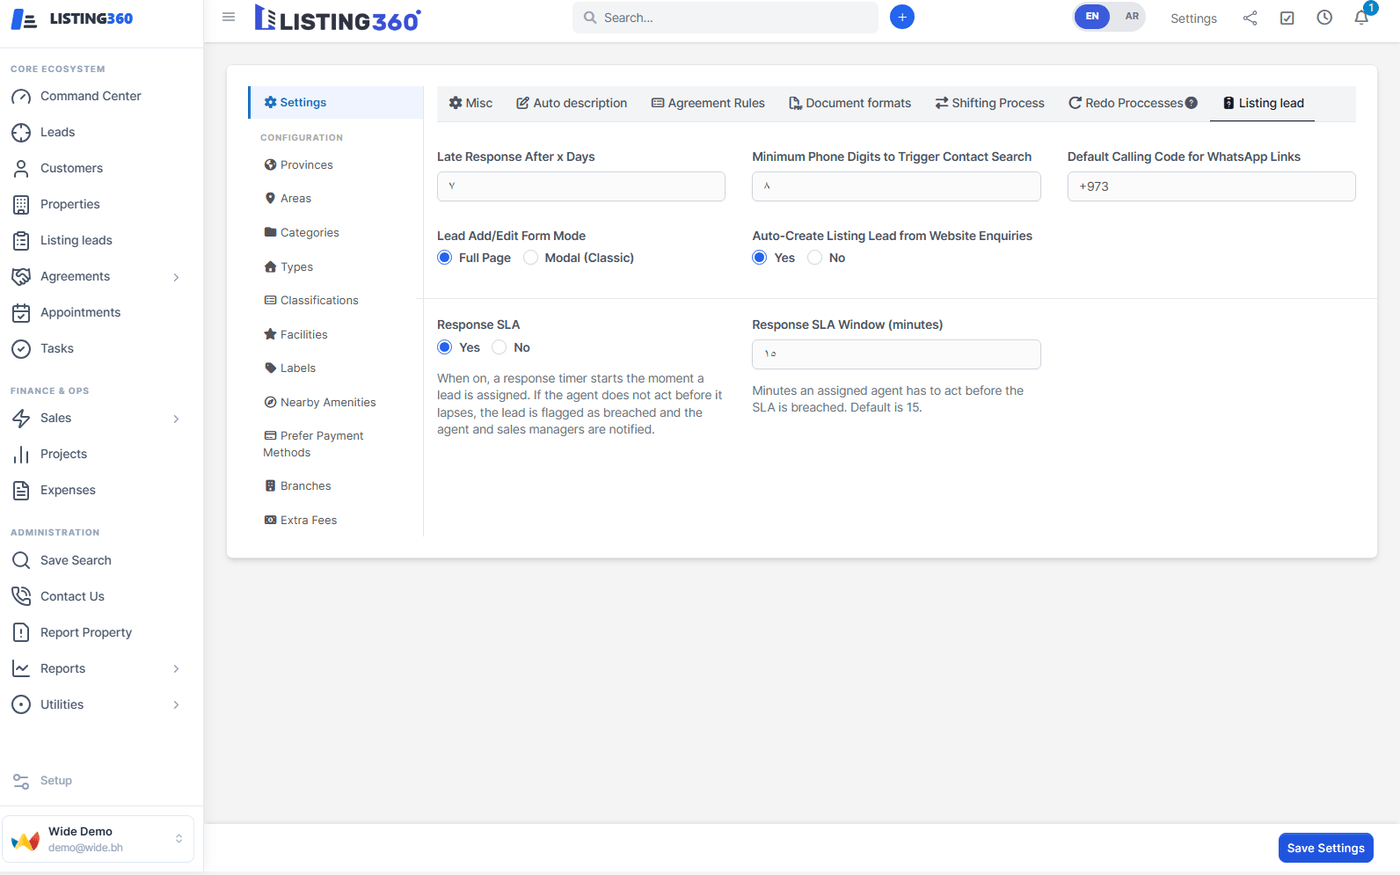
| Setting | What it does |
|---|---|
| Late Response After x Days | Days of inactivity before a lead is flagged as late. |
| Minimum Phone Digits to Trigger Contact Search | Controls duplicate-contact lookup sensitivity. |
| Lead Add/Edit Form Mode | Toggle between "Full Page" and "Modal (Classic)." |
| Auto-Create Listing Lead from Website Enquiries | Whether website submissions auto-become Draft leads. |
| Response SLA | A response timer starts when a lead is assigned — if the agent doesn't act in time, the lead is flagged and managers are notified. |
| Response SLA Window (minutes) | Minutes before the SLA breach fires (default 15). |
Setup → Properties → Settings → "Listing lead" tab
| Event | Who hears about it | How |
|---|---|---|
| Lead assigned to you | The agent | Notification + email |
| Response SLA breached | The agent and all sales managers | Notification |
| Nurturing reminder due | The agent (+ managers, if enabled) | Notification + email |
| Bypassed Agent / legal recovery flagged | All sales managers | Notification |
Both emails are ordinary Perfex email templates, editable under Setup → Email Templates, and support merge fields: {lead_id}, {staff_name}, {lead_link}, plus {assigned_by} / {assigned_date} for the assignment mail and {hold_reason} / {reminder_date} for the nurturing reminder.
The Command Center is the sales-performance dashboard built on this data, including a per-agent "Performance Index" score. It reads directly from the activity log, so using proper status-change actions keeps the numbers accurate.
Closing the deal — Property Agreements
Creating a Property Agreement is what actually closes a deal with both the buyer/tenant and the property owner, and it's the only door into a listing lead's Won status. The full approval workflow (Booked → Manager Approved → Owner Approved → Waiting For Payment → Paid), deposits & vouchers, sale-vs-lease differences, permissions, and — importantly — how this should link back to a Listing Lead, are covered in the dedicated Property Agreements guide.
Setup → Website Settings
The single hub for everything public visitors see: header, footer, hero images, homepage, search behavior, the property-detail page, and social links. Full breakdown in the Frontend & Website Guide.
Setup → Finance Settings (Tax Rates / Currencies / Payment Modes / Expenses Categories) covers the basic configuration of core finance building blocks.
Payment gateways (MPGS, Tap, BenefitPay, Benefit) are each enabled individually under the core Setup → Payments area.
| Need to... | Go to |
|---|---|
| Schedule/track viewings and meetings | Sidebar → Appointments |
| Send a formal sales quotation to a client | Sidebar → Project Quotation |
| Value/appraise a property formally | Sidebar → Property Valuation |
| Reorder or rename the admin sidebar | Setup → Listing360 Menu |
| Export data to CSV | Sidebar → Utilities → CSV Export |
| Back up the database | Sidebar → Utilities → Backup |
| Check the WhatsApp/Instagram/Messenger inbox | Sidebar → Messaging Hub → Inbox |